In this guide provided by Space Hosting, we will show you how to install, setup and configure WordPress on your server hosting i.e Ryzen VPS, AMD Dedicated servers, etc.
Table of contents
- Introduction
- Install WordPress on your Server
- Basic Requirements
- Dependencies Installation
- Database Configuration
- WordPress Installation
- WebServer Configuration
- WordPress Configuration
If you don’t own a server, you can review our server hosting solutions or contact our sale department.
€ 2.99
First Month
1. Introduction
WordPress is a content management system (CMS) that allows you to host and build websites. WordPress contains plugin architecture and a template and many more features. Nowadays, WordPress plays an important role in enhancing business because websites can be built through WordPress with the drag/drop feature available in plugins such as Elementor, WPBakery, etc. The designers, bloggers, and developers are moving to WordPress in order to make their work smooth and reliable.

The WordPress sites can be optimized through custom plugin development. It can boost the performance of the sites through already-developed plugins such as LiteSpeed cache, WPRocket, etc. One of the important factors that WordPress has is that it stores the content of the post or page in a database except for multimedia files etc, so it’ll also boost the performance because the content will fetch from the database through multiple SQL queries.

The migration of WordPress from one hosting provider to another or one server to another is very easy if we exclude the operating system dependencies. If your WordPress site is using the default extension of PHP and Apache/Nginx Web server then migration will be easy, you just have to make a backup of your WordPress folder and database then follow the steps given below in the new server, after replacing the new WordPress folder with the backup folder and new database with the backup database.
2. Install WordPress on your Server
3. Basic Requirements
- Root Server
- Fresh install Ubuntu/Debian OS
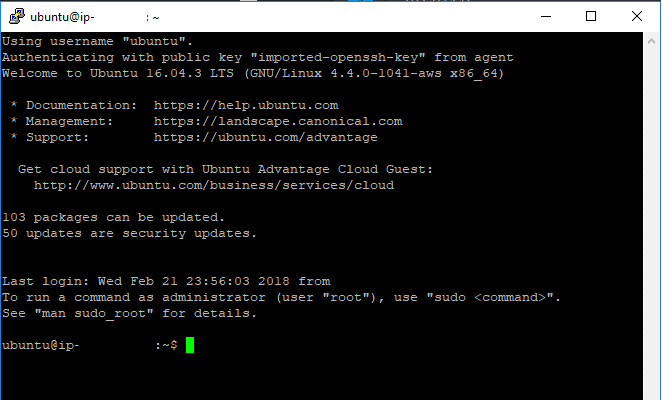
Connect to the server using Putty

4. Dependencies
Before installation of the WordPress application, the dependencies required in order to run WordPress without any problem must install on Linux. The applications such as Apache, and MariaDB perform the backend functions of WordPress.
Type and send line by line the following commands in order to install the dependencies:
apt install apache2 unzip wget curl mariadb-client mariadb-server

apt install sudo nano -y

sudo apt install -y lsb-release ca-certificates apt-transport-https software-properties-common gnupg2 -y

echo "deb https://packages.sury.org/php/ $(lsb_release -sc) main" | sudo tee /etc/apt/sources.list.d/sury-php.list

wget -qO - https://packages.sury.org/php/apt.gpg | sudo apt-key add -
Now it is time to update & upgrade your system with the following command:
apt update && apt upgrade –y Next, install php8.1 with the following command:
apt install php8.1 -yNow access MySQL with the following command:
mysql –u root –p5. Database Configuration
Below commands will create a WordPress user and database and give privileges to the specific table.
create database wordpress;
create user 'wordpress'@'localhost' identified by 'PASSWORD';
grant all privileges on wordpress.* to ‘wordpress’@’localhost’;
flush privileges;
exit;
6. WordPress Installation
Now configure WordPress and update the files/folders permission of WordPress.
cd /var/www/html && rm index.html
cd /home && wget https://wordpress.org/latest.zip
unzip latest.zip
rm latest.zip
cp -R /home/wordpress/* /var/www/html
chown -R www-data:www-data /var/www/html
sudo find /var/www/html -type d -exec chmod 755 {} ;
sudo find /var/www/html -type f -exec chmod 644 {} ;
7. WebServer Configuration
We will use an Apache web server in order to run your WordPress site publically. This is an important step so please type the commands properly. we will use nano editor to edit the text file
nano /etc/apache2/sites-available/wordpress.confNote:
- Edit <TypeYourEmail> and <TypeYourSubDomain>
- for example: edit <TypeYourEmail> to [email protected] and <TypeYourSubDomain> to space-hosting.net
Paste the Following content to the editor
<VirtualHost *:80>

     ServerAdmin <TypeYourEmail>

     DocumentRoot /var/www/html/

     ServerName <TypeYour(Sub)Domain>


     <Directory /var/www/html/>

        Options +FollowSymlinks

        AllowOverride All

        Require all granted

          <IfModule mod_dav.c>

            Dav off

          </IfModule>

        SetEnv HOME /var/www/html

        SetEnv HTTP_HOME /var/www/html

     </Directory>
Note: To save Nano Text Editor files, Press: CTRL + X Button to save a file
Continue Typing the following commands
a2ensite wordpress.conf
systemctl restart apache2
apt install certbot python3-certbot-apache -y
certbot --apache
WordPress Configuration
Now everything is completed regarding typing commands in the terminal, Now it’s time to install WordPress using your browser. Installing WordPress is a simple process that takes less than five minutes to complete.
# Just visit YourDomain.com/wp-admin and Type the following information in Database

- After you have entered your database connection, click Submit.
- On the next page click on “Run the installation”:
- In the following menu, you can type information as required and create an admin also.
- After you click on Install WordPress, it will confirm that the installation was successful. Now click on “Login” to log in to the WordPress Admin Panel.


0 Комментариев