Customize Consent Preferences

We use cookies to help you navigate efficiently and perform certain functions. You will find detailed information about all cookies under each consent category below.

The cookies that are categorized as "Necessary" are stored on your browser as they are essential for enabling the basic functionalities of the site. ... 

Always Active

Necessary cookies are required to enable the basic features of this site, such as providing secure log-in or adjusting your consent preferences. These cookies do not store any personally identifiable data.

No cookies to display.

Functional cookies help perform certain functionalities like sharing the content of the website on social media platforms, collecting feedback, and other third-party features.

No cookies to display.

Analytical cookies are used to understand how visitors interact with the website. These cookies help provide information on metrics such as the number of visitors, bounce rate, traffic source, etc.

No cookies to display.

Performance cookies are used to understand and analyze the key performance indexes of the website which helps in delivering a better user experience for the visitors.

No cookies to display.

Advertisement cookies are used to provide visitors with customized advertisements based on the pages you visited previously and to analyze the effectiveness of the ad campaigns.

No cookies to display.

14-Day Money Back Guarantee on Cloud Solutions + 1H/mo extra Managed Support

14-Day Money Back Guarantee on Cloud + 1H/mo extra Managed Support

Installing Web Hosting Panels from VPS Control Panel: A Step-by-Step Guide

web panel

februari 10, 2023

A step-by-step guide on how to install CWP from Virtualizor.

Table of Contents

  1. Overview
  2. Procedure

Overview

Virtualizor allows end users to install Control Panel directly on the VPS. However, shutting down the VPS will be required in the case of Xen and KVM VPS.

NOTE : The Control Panel option should be enabled by Space Hosting. So, in case you cannot see it, write us.

Procedure

Login to Virtualizor Enduser panel -> Select the VM on which you want to install the control panel -> Click on the Install tab -> Click on the Control Panel button. You will get a screen as shown below where you can see the CWP icon for selection. After the selection is done it will ask for a confirmation, an alert will be shown, and click on Yes to begin the installation.

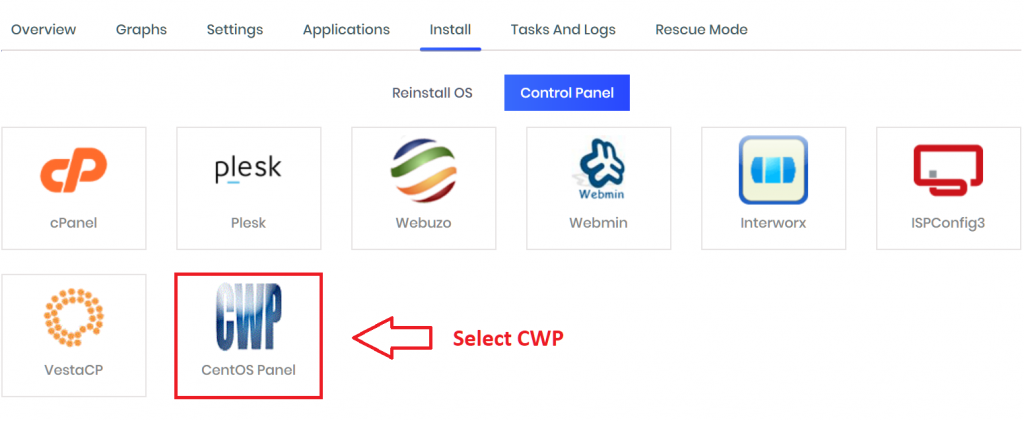
NOTE : For Xen and KVM VPS, you will need to Shutdown and then Start the VPS (not restart). This is required so that Virtualizor can alter files which is not possible during a restart and is only possible during the startup of the VPS after it has been shutdown. For OpenVZ VPS, the installation begins instantly.

Follow and like us:

About US

Welcome to the Space Hosting Blog

Stay updated with the latest news from the Top Tier Leading European cloud provider. Explore technical insights from our engineers, interviews with satisfied customers, and our posts on the digital revolution.

VPS OS Reinstallation: A Simple Guide

A step-by-step guide on how to connect to Re-Install OS Note : Please make sure you already have backup of the VPS . Re-install OS will create fresh VPS without any data . To Re-Install OS, go to the VPS Management panel and click...

Mastering VPS Management: An Essential Guide

A step-by-step guide on how to connect and manage your VPS. To manage VPS click on "List All". Then Click on the arrow shown next to the VPS ID. You can select options from VPS Management Page...

Change Root Password: A Beginner’s Guide

A step-by-step guide on how to change the Root password. To Change the Root Password of your VPS, go to VPS Management Page, click on “Change Password“, enter New Password, and then click on “Change Password“. Your Root Password...

Change VNC Password: A Starter Guide

A step-by-step guide on how to change VNC Password. Go to VPS Management Page, and click on “VNC Password”. To change your VNC Password, enter your new password and again retype the same new password for confirmation and then click...

Launching Instances for Resellers: A Beginner’s Guide

A step-by-step guide on how to Launch Instace for Resellers. If the user’s billing is disabled you can create the VM instance from the below page.

You May Also Like…

0 reacties

Een reactie versturen

Je e-mailadres wordt niet gepubliceerd. Vereiste velden zijn gemarkeerd met *

Pin It on Pinterest